So semi-recently I was involved with a very small shoot involving a green screen, designed to teach us about green screens, their setup, lighting involved and all the post production elements required in order to replace the green screen with the desired image. More interestingly, the shot we had to composite a plate image into, the one with the green screen part to it, was a dolly shot (a moving shot), which meant that the set was moving at a different rate to the green screen, and so this differential needed to be accommodated for in post.
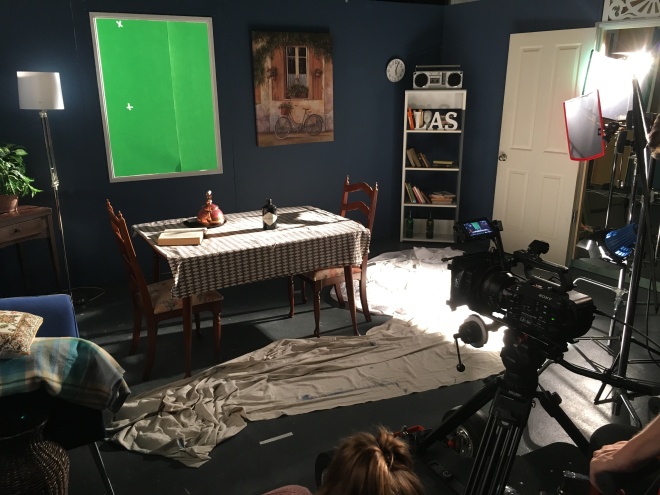
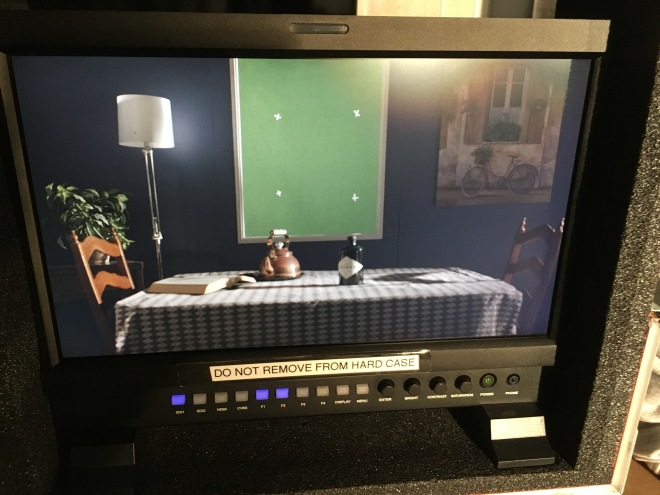
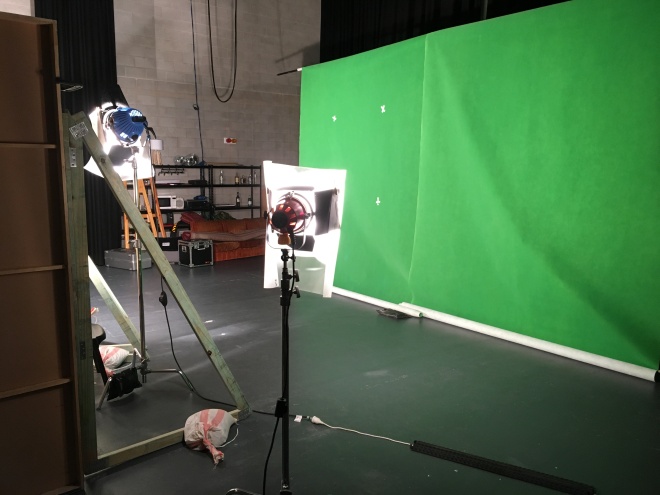
The first step in this process is, of course, the setup of both the set and the green screen. The set was set up with a ‘window’, behind which a green screen was set up about 5 meters further back, and around which there could be no green objects so that they did not interfere with the key that would be necessary for the compositing to take place. Additionally, the green screen had to be large enough to totally fill the window at all times, so the limits of the shot movement had to be settled upon first. This was a bit of a feedback loop, however, as there was a limit to the size that the green screen could be, which limited which movements were possible. Once these limits were decided and both the set and green screen were set up, the lighting had to be adjusted on both to make sure the video at the end was of a high quality. Lighting the set is a problem in and of itself, but this problem was not affected by the inclusion of the green screen. However, we did have to make sure that the lighting on the set, particularly the time of day and direction of the lighting, was consistent with the lighting that would exist in the plate shot (the shot superimposed onto the green screen), which we shot later that afternoon. The lighting of the green screen itself was an issue that I had not come across before, so it was lucky there were experts on hand teaching us. Turns out, a green screen should be lit very flatly, so that the entire screen is a single shade of green, with as little fluctuation or noise as possible. This is so the key (the selecting of the green colour to be digitally removed from the shot) is uniform and of a higher quality, or accuracy, meaning that there are no green lines around the outside of everything or green sparkles throughout that we were compositing into the shot.

When you set up a green screen, however, you don’t just set up a green screen. You also have to place the green screen tracking markers, small marks or crosses of a different colour so that the movement of the screen itself can be seen relative to the movement of the foreground set. This is a largely ‘invisible’ part of the process, as it is one of the last things done before the shot is taken, and is never seen outside of the post-production process, and perhaps as a result of this, it was a part of the process which I didn’t know about. The purpose of these tracking markers, if you were wondering, is to give reference to how fast the movement of the green screen was in relation to the movement of the set. The difference between these 2 speeds will increase as the distance between the set and green screen increases. Another way of saying that is that the further away from the camera the green screen is, the slower it will move, while the set stays at the same speed while it is close to camera. However, the further away from the set the green screen is, the larger it has to be to completely fill the space in the shot it needs to, and the harder it is to light the whole screen evenly. But if the screen is too close, then light from the screen will bounce back into the set, which can both disrupt the lighting setup for the set, and look totally unnatural depending on what the green screen is being replaced with. It’s all a balancing act, and I’m glad that the first time that I encountered these problems was in a controlled exercise, rather than something where the final result was drastically important. There has to be a minimum of 3 tracking markers to create a plane (as in a 2D surface, rather than an aircraft) which moved at a different rate to the plane of the window. The markers were positioned to be as far apart as possible while still all remaining visible at all times in the moving shots. This meant that the marks had to be moved in between different shots, and again, wouldn’t have been something I realised before doing a take and noticing in the frame. It also means that for shots where the camera doesn’t move, these markers become totally redundant. The marks themselves have to be sized big enough to be clearly visible, but not so large as to overpower the green, and had to remain as separate and distinct marks, so can’t overlap in any way.
The plate shot seems like the simplest part of this whole process, but as I discovered, there are far more technical consideration for the plate shot that need to be taken into account than I realised. These include that the plate shot has to be shot with the same lens as the green screen shot, and all the details of the green screen camera shot (such as the distance from the camera to the green screen, any angles involved) must be conserved over shots between the green screen and the plate. It makes sense once you think about it because it ensures that the background appears and behaves as it should once it is composited into the shot. However, it’s one of those things that, had I not been in the presence of people that knew what they were doing inside and out, I probably would have forgotten to measure in the first place, and so would have been unable to faithfully recreate these factors, meaning I would end up with a final product that would just look off.
Despite all of these obstacles and challenges involved, life on set actually went really well and it felt like we were able to easily overcome or avoid all of these potential trip ups. This was, of course, due to the fact that we have advanced knowledge sources helping us every step of the way: if we tried to accomplish this on our own without all of this expert help and advice, we would have ended up with a disaster, I have no doubt. It was only because we had experts there helping us that we didn’t have to learn all these lessons the hard way and end up with an absolutely disastrous final product.
The actual composite was the part where we were left on our own a lot more, meaning it felt a lot more challenging. We still did get some expert pointers but were left more on our own to encounter any problems that showed up and learn first hand what the point of all the precautions we took on set were for. And even with the help we got, problems did show up. Because we recorded in cinema lock, the colour space was compressed and the LUT we tried to use to correct this didn’t work perfectly, causing a lot more colour grading to be done. Additionally, the colour grade was difficult to get to the stage where the colours popped without creating a huge amount of noise in the green of the green screen. The noise then makes it difficult to get a decent key off the green, so then the key has to be expanded and includes all other green objects in the room, making it so that more layers have to be added to the composition to add a mask over the top, so that only the green of the green screen is replaced by the plate shot. Despite this, I can’t even imagine all the problems that would have shown up if we hadn’t had expert help.
Overall this project was very interesting to be a part of because I learned a lot more than I thought I would. It gave me an appreciation of all the difficulties involved in green screening that I didn’t know about, and I already thought it seemed difficult. I’m glad then that I did this exercise because, for me, the best way of learning is doing and seeing the process done, seeing the mistakes be made (or making them), or seeing them purposefully avoided. It helps me learn far more than just being told “a green screen needs to be lit flatly”, to see a green screen be lit flatly and understand the reason why. I fully recommend you to practice messing around with green screens if you have the opportunity because it is very interesting and different filming experience. If you do, however, make sure you follow the process through post-production as well, because that is where a lot of the learning takes place, and you see all the effects of the measures you take on set. Well worth the effort.
